Showing posts with label yeast. Show all posts

Thursday, January 6, 2011

Home made ciabatta and family cooking


I love baking with my family. You might remember how I told you in my last post that as soon as I got home for Christmas, my mum made sure I had all the necessary ingredients to bake. Over the holidays I made cookies with my sister, yeasted orange raisin bread and this delicious ciabatta. 

We are a family of cooks. My dad, being from the region of Spain where paella is from, is great at anything rice. His 'brothed rice' as you might translate it, is out of this world good. Cooked slow, with tons of veggies and some meat, is my favorite comfort food. And it happens to be quite healthy. Maybe I should show you guys how to make it soon. 


My mum has several specialties. There's her meat stuffed calamari and her meatballs with squid. Both are things I used to request as my birthday celebration lunch. They are just to die for. Her pork tenderloin stuffed with prunes and sausage is quite epic as well. In fact, when I lived back in Boston, I made it for a friends' bday and my vegetarian roomie tried it. According to her, it smells too good not to do so. 

My sisters have her signature dishes as well and they've gotten to master some of my mum's dishes. And I'm the baker of the family. Quite honestly, it works pretty well this way. I enjoy teaching my mum how to make ciabatta or making her apple cake. I love seeing my dad dip a piece of orange raisin bread in his morning coffee. I had lots of fun making decorated cookies with my sister.

All in all, I feel really grateful for a family of cooks and eaters. For having grown up appreciating good ingredients and home made goodness. Sitting around the table and enjoying meals with my family makes me happy. Incredibly happy. This is the ciabatta I made with my mum. Probably the best thing I've ever baked. With a hard crunchy crust and a fluffy crumb. Try it, you'll thank me later. 


Peter Reinhart's Ciabatta (from the Bread Baker's Apprentice)

For the poolish (pre-ferment)
Bread flour – 2 1/2 cups
Water – 1 1/2 cups
Fresh yeast – 1/2 tsp

For the final dough
Poolish – 3 1/4 cups (All of the Poolish above)
Bread flour – 3 cups
Fresh yeast – 2 tsp
Salt – 1 3/4 tsp
Water – 1/2 cup
Olive Oil – 4 tbsp

The night  before baking prepare the poolish. Dissolve the yeast in lukewarm water and stir in the flour. Mix with your hand or a wooden spoon until combined. The poolish will be quite liquid. Cover it with plastic wrap and let it rise for a few hours in a warm place and then in the fridge overnight. 

The day of baking, remove the poolish from the fridge and let it rest outside for at least 1 hr before using it. When the poolish is ready, mix the yeast with the water (lukewarm) and then add the flour, salt and olive oil. If the dough is too sticky, add a little more flour. (Too sticky means it doesn't come off the walls of the bowl you're mixing it in). Flour your counter and place your dough in it. Stretch the dough and fold it over itself the same way you fold a letter. (One third of it towards the center, then the other third, then fold those two parts so it looks like a closed book). Repeat the folding and brush the top of the dough with olive oil. Let the dough rest for 30 min. Repeat the folding and brushing and let the dough rest for 2 hrs. Cut your dough in whatever shapes you'd like, I made two loaves. Put it on top of parchment paper and let it rise for 1 hr. Preheat your oven to 220 C or 400 F. Bake your loaves for 20-25 min, until they are golden brown and make a hollow sound when you 'knock' them.


Tuesday, July 6, 2010

Soft pretzels and barbecue pretzel bites


I tried pretzels for the first time at the Reading Terminal Market in Philly. I was visiting my friend Michael, who lived there at the time and who insisted I had to try 'those' pretzels. I had tried pretzels before, German style, at the cafeteria of the Goethe Institut in Barcelona, exactly during the World Cup of 2006. Liked them, but not so much. I've always been more of a hard pretzel person. Or I was until I tried 'those' pretzels.

They were soft, warm, yummy, salty but not so much and the perfect snack. I think I ate mine in 30 seconds flat. No kidding. It was that good. I thought making them at home would be an impossible mission. Oh boy, was I wrong. Ok, I'll admit it's not the best thing to bake in a hot summer day, but still, I survived the mission.


For those of you who are unfamiliar with them, the secret to that hard crust and soft inside is baking soda. The pretzels are briefly boiled in a bath of water and baking soda and then baked until golden brown. Of course, they wouldn't be authentic pretzels without those perfect coarse salt crystals.


Now, those are not salt crystals, or twisty pretzels. What are they you ask? Barbecue pretzel bites! My friend B is obsessed with those barbecue pretzel bites from Snyders. He always says that they are the pretzel pieces that fall in the floor when they are making them in the factory. And obviously, to masquerade the floor-taste, they cover them in barbecue flavored powder. Hilarious, ain't it?

Well, floor or not, those bites are really yummy. I toyed with the idea of making hard pretzel bites, but apparently hard pretzels are not so easy to make. Instead I cut some of the pretzel dough in pieces and coated them with barbecue spice mix (the one you find in the supermarket for your meat). Not quite the same thing, but pretty tasty and more 'natural' than that suspicious red powder that coats the store bought pretzels.

Honestly, however you make them, just make them. They are ideal for some snacking at your summery grilling!


Recipe adapted from  Tracey's culinary adventures
Note: I made half recipe, got a bunch of bites and 16 small pretzels

Print this recipe

1 1/2 cups warm water (about 110 F)
2 tablespoons sugar
1 package (2 1/4 teaspoons) active dry yeast
3 ounces (6 tablespoons) unsalted butter, melted and cooled just slightly
2 1/2 teaspoons coarse salt
4 1/2 to 5 cups all-purpose flour

For the soda bath:
3 quarts water
3/4 cup baking soda
For coating:
1 whole egg, beaten with 1 tablespoon cold water
coarse sea salt
barbecue spice mix
Proof the yeast in half a cup of lukewarm water and the sugar. In a bowl, place the flour (start with 4 1/2 cups, you'll add the rest if necessary) and make a well in the center of it. Add the yeast, cooled butter and the rest of the water. Mix with a wooden spoon until the dough is not sticky, adding more flour if necessary. Let the dough rise for about an hour or until doubled in size. On a floured surface, roll the dough into long ropes, as thick or as thin as you want. Shape the dough with the traditional pretzel shape or cut it into little bites.

Preheat your oven to 400 F

Boil the pretzels in the soda bath for about 30 seconds each. Place them on a baking sheet, brush them with egg wash and sprinkle them with salt or barbecue mix. Bake the pretzels for 15 to 20 minutes, until golden brown.


These pretzels were submitted to this week's yeastspotting!

Monday, June 14, 2010

Hazelnut chocolate swirl bread


Lately I've been thinking about food a lot. Well, that's not really surprising. But I've been having serious conversations with myself about it. Ugh, that sounds weird. Let's start again. Lately I've been having deep, elaborate thoughts about cooking, baking and food itself. About how what I put in my mouth affects my moods, my body and my health. That's more like it. 

I look back a couple years ago and realize I've changed a lot the way I eat. I've never been one for packaged stuff like Ding-dongs or Twinkies, in fact I find them really gross. Nor am I miss butter-y girl either. I don't cook with butter and I try to reduce amounts of it in baked goods. You could say I don't like greasy stuff, even if I really enjoy well made fries. But still, a year ago, you could find me devouring, quite often, all the baked goods that my roommate brought from the bakery she worked at. Indeed they were fine pastries, cakes and cookies, but the sugar levels were sort of scary.


I'm done with sugar comas. I enjoy dried fruits more than I enjoy candy (although I do eat gummy bears every so often), I like raw sugar much better than the refined one and I'm definitely not into buttercream frosting. I also use and abuse whole grains on a daily basis and try to stay away from anything pre-made or pre-packaged, even the bread. Call me a freak if you wish.

This bread is the result of those two years of changes. Of how much I enjoy a freshly baked loaf of home made bread, be it sweet or not. This bread has the perfect amount of sweetness, the creaminess of the chocolate and the crunch from the hazelnuts. The  hard crust prevents it from drying and keeps all the flavor inside. A great substitute for those of you who could die for a toast with nutella. The perfect sunday morning breakfast.


I baked this one along with a cinnamon swirl bread soon to come. I plan on baking many more breads in the future, I'm even toying with the idea of a 'one bread a week' sort of thing. I'm also moving towards more elaborate pastries, cookies and others. I feel like I need to use more with fruits in season in my baked goods, along with almonds, hazelnuts, sesame seeds, honey and other natural sources of flavor. Stay tuned folks, nothing bad can come out of this!

The recipe is a remake from the cinnamon swirl raisin bread from the Bread Baker's apprentice. I left the same basic dough but took out the cinnamon and added chopped hazelnuts and chocolate. I also changed instant yeast for active dry yeast. Since the recipe yields two loaves, I made another one braided and with cinnamon, no raisins. Coming soon!

This bread was sent to the Bread Baking Day event of this month, breads with nuts! You can find it here


Print this recipe

3 1/2 cups bread flour (16 oz)
4 teaspoons sugar
2 1/2 teaspoons (1 packet) active dry yeast
1 large egg beaten
2 tablespoons butter melted
1/2 cup buttermilk (you can substitute for whole milk)
3/4 cup lukewarm water
1 cup hazelnuts, chopped
1 cup bittersweet chocolate, chopped

Dissolve the yeast in the 3/4 cups of water and add a teaspoon of the sugar. Let it sit until the yeast 'wakes up' and doubles in volume. In the meantime, combine flour and sugar in a bowl and separately, melt the butter. Make a well in the center of the flour and add the yeast, mix until combined. Add the egg, buttermilk and butter and mix until the ingredients come together to form a ball. Place the ball in a floured surface and knead for about ten minutes. Place the dough in a greased bowl and let it rise overnight in the fridge or for about 2 hr at room temperature (proofing in the fridge gives depth of flavor).

Once doubled, split the dough in half. Roll each ball into a rectangle about half an inch thick. Spread the hazelnuts and chocolate and roll the dough like a swiss roll. Starting on the longest side of the rectangle. Tuck the ends of the dough underneath the rest and place it in a loaf pan. Let it rise for an hour. Brush the top with egg wash and sprinkle with more hazelnuts.

Bake at 350 F for 40 minutes rotating the pan half way through the baking time. The bread is done when it makes a hollow sound if thumped.

Tuesday, May 11, 2010

Step by step Challah


I feel like making bread is like making babies Frankensteins. (Considering the whole process, seems like baby making is not the best metaphor). Like making Young Frankensteins. Please tell me you've seen the movie. If not, go watch it. Now. Well, finish reading this, then go.

(By the way, I just can't compare making bread with the real Frankenstein, I don't take myself that seriously.)

So, bread making. You have your pieces... your flour-legs, water-arms and different combinations for the torso. It can have eggs, oil, milk or just a pinch of salt. And once you have everything together, you need an infusion of life. You guessed right, that would be the yeast. You crumble it, put it in water and it's like giving electricity to Frankenstein. It's aliiiiiiiiiiiiveeeee!!!


Finding fresh yeast in Boston has proven to be a difficult task. Sure you can substitute for dry and create wonders, but I really wanted to try the real deal. I finally found some fresh yeast at the grocery store and wanted to work with it right away. Since my labmate was organizing a dinner party I offered to bring some homemade bread. And I decided to try making a Challah.

For those of you not familiar with it, Challah is a traditional jewish bread. It contains oil and eggs, which give it a soft, almost brioche-like texture and shiny top. The most popular shape for Challahs are three strand braids, although in Rosh Hashana (Jewish new year), the braid is usually shaped as a circle.

Raisins can be added to the bread, but I find it delicious plain. Toasted or not, combines equally well with sweet and savory stuff. And making it was really easy.

Let's go through the process together...

First, mix 1 yeast cake (17 g fresh yeast) with 125 mL  (1/2 cup) of water and 2 tablespoons of sugar... and let the magic happen...


In a bowl, combine the foamy yeast mixture with 2 cups of flour (about 250 g), 30 mL oil (6 teaspoons), a pinch of salt and 1 large egg. Knead the dough until smooth and not sticky. If kneading doesn't do the job, you can add a bit more flour. Oil a bowl and let the dough rest for 2 hr, until doubled in volume or, if you have more time, overnight in the fridge, which is what I did.


Punch down the dough and cut in three equal pieces. Roll the pieces into strands and braid them.


Brush the challah with egg and sprinkle with sesame or poppy seeds if you wish. Let the dough rise for about an hour or until doubled in volume. Believe me, it does double.


Bake at 350 F for about 15 to 20 minutes, until the surface is golden shiny brown. It is done if it sounds hollow when you tap it. 


Sorry I didn't get to take any shots of the inside, but I promise it was amazingly soft with an almost brioche texture and a crunchy top. It was a complete success and I'm sure this is not gonna be the last challah I make.

This recipe was sent to yeastspotting and to the Bread Baking Day challenge # 30, twisted breads


Recipe adapted from here 

Tuesday, May 4, 2010

Brioches


When I was a kid my mum would buy me brioches once a week. They were shaped like a little loaf of bread and she'd fill them with ham and cheese for breakfast. I guess those childhood memories are the reason why I love brioche. So much so, that even though the bakery next to my place has wonderful muffins, croissants and other pastries, if I ever buy anything, it's always a brioche.


The slight sweetness of this bread combines well with sweet and savory. And let's face it, there's nothing as fluffy and delicate as a warm brioche. These ones were good, although they certainly will get better with practice. I'm sure my friend S will be willing to try all the possible recipes and trials. I know this because while sniffing one of these brioches she gave the following speech:


'I don't understand why people would want to sniff drugs when there's the smell of freshly baked goods, for real, I don't get it'

I guess I don't need to say no more!


500 g flour
250 mL lukewarm milk
7 g active dry yeast
75 g sugar
75 g butter melted
1 egg

To make sure your yeast is active, dissolve it in half the lukewarm milk and add a tablespoon of the sugar. Let it proof for about 10 min. It should rise very obviously.
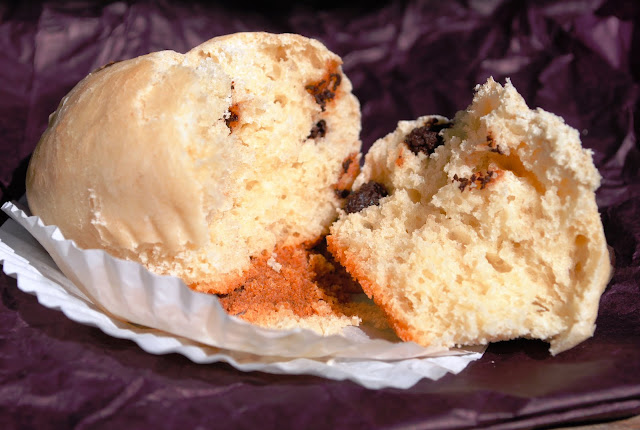
In a bowl, combine the flour and sugar. Make a well in the center of the mix and add the yeast mixture and the rest of the milk. Mix well with a wooden spoon or your hands. Add the egg and the melted butter and combine. The dough will be slightly sticky. Knead it until smooth by folding it over itself repeatedly. The more air you trap in the dough, the fluffier and softer the brioches. If you'd like, mix in a few chocolate chips into the dough for chocolate brioches.
Let the dough rise in a slightly warm place for about 2 hr or until doubled in volume. Split the dough in 12 equal pieces (weighing it is a good idea). Place in muffin tins and/or baking cups. Let it rise for an hour. Ideally, brush the brioches with egg wash before baking. My yeast was not working very well and I was afraid I'd deflate them, so I didn't.

Bake the brioches at 400 F for about 10 or until golden brown.


 This recipe was submitted to Yeastspotting

Thursday, April 22, 2010

Krapfen with International tarting


Cute, round, yummy, filled with all sorts of good stuff... what are they? Krapfen!

Krapfen, or berliners, are a german doughnut made from sweet yeast dough (not so sweet really). They are usually fried and filled with marmaled or jam and sprinkled with powdered sugar.

Carmen, our new team member at International Tarting, proposed making this pastries as a challenge. None of the members is very fond of frying so we decided to bake them. And I have to say, despite they are very yummy, I'm sure these Krapfen improve when fried. Frying probably would give them more of a doughnut texture, whereas baking makes them more of a sweet bun thing. Anyway! they are delicious!

As I said, these doughnuts are usually filled with all sorts of  yummy things. Each one of the 'International tarters' chose different fillings. I went with dark chocolate, white chocolate and raspberry jam. I'm not a fan of white chocolate, my friend Stephie took care of those. The raspberry jam ones were pretty amazing...

BUT when you warm up the chocolate ones...


Well... don't you feel the need to lick that chocolate? Because boy, I did!

And then when you open them...


So, if by now, you don't feel the need to make these, well, I really don't know how to convince you...

Now for the recipe! Makes 24 krapfen of about 2 inches diameter.

New feature! Printable recipe


4 cups all purpose flour
2 3/4 teaspoons active dry yeast
3 tablespoons sugar
3 tablespoons oil
1 cup lukewarm milk
2 eggs

In a bowl, combine the lukewarm milk with the yeast and a tablespoon of sugar. Let it rise for about then minutes or until doubled in volume. In the meantime, combine in a bowl the flour, sugar, oil and eggs. Once the yeast has risen, add to the flour mixture and mix well (I did it with my hands).
Now let the dough rise until doubled in volume. My kitchen was specially cold that day so I heated the oven to 150 F, then turned it off and put the bowl with the dough inside. Once doubled, roll the dough in a floured surface, until you get it to be about 3/4 inch thick. Cut the krapfen with a biscuit cutter or any other round (or not) utensil.

Place the krapfen in a floured cookie pan. Let them rise again. I would say until doubled, but mine didn't double. In my case, it took about 3 hr to get to the maximum they would rise. Bake the krapfen at 350 F for about 10 min. While they are still warm, brush the top with melted butter.

Once the krapfen are cool they are ready to be filled. For a chocolate filling, mix about 2 tablespoons of chocolate chips with 1 or 2 tablespoons of heavy cream. I used a big syringe to fill the krapfen. Anything 'squeezable' works well, but take in account that you want to use something with a long tip so you call fill them all the way through.

And now the krapfen are ready to eat! you better enjoy them while they last, which let me tell you, it's not gonna be long!